vue基础指令
约 1027 个字 1231 行代码 10 张图片 预计阅读时间 19 分钟
内容渲染指令v-html和v-text
| Vue |
|---|
 1
 2
 3
 4
 5
 6
 7
 8
 9
10
11
12
13
14
15
16
17
18
19 | <script setup>
// 内容渲染指令,放在双标签的起始标签
// 1. v-html:可以渲染HTML标签和属性,作用等同于JavaScript中的innerHTML
// 2. v-text:纯文本显示,作用等同于JavaScript中的inneText
// 其中,v-text作用与插值表达式相同
// 需要注意,使用v-html或者v-text时,都不能在该标签内部带子标签或者写内容
const msg = "<span style='color:red;'>hello world</span>"
</script>
<template>
<div>
<p v-html="msg"></p>
<p v-text="msg"></p>
<!-- v-text的作用类似于插值表达式 -->
<p>{{ msg }}</p>
</div>
</template>
|
属性绑定指令v-bind
| Vue |
|---|
 1
 2
 3
 4
 5
 6
 7
 8
 9
10
11
12
13
14
15
16
17
18
19
20
21
22 | <script setup>
import { ref } from "vue";
// v-bind属性绑定指令
// 作用:使得任何标签的属性可以使用动态值
// 基本语法:v-bind:属性名="表达式"
// 也可以简写为::属性名="表达式"
const msg = "https://www.baidu.com";
// 动态修改值
const url = ref("https://www.bing.com")
</script>
<template>
<div>
<a v-bind:href="msg">百度一下</a>
<!-- 简写为 -->
<a :href="msg">百度一下</a>
<!-- 绑定响应式数据 -->
<a :href="url">必应</a>
</div>
</template>
|
事件绑定指令v-on
| Vue |
|---|
 1
 2
 3
 4
 5
 6
 7
 8
 9
10
11
12
13
14
15
16
17
18
19
20
21
22
23
24
25
26
27
28
29
30
31
32
33
34
35
36
37
38
39
40 | <script setup>
import { ref } from 'vue'
// v-on指令,用于对标签进行事件绑定
// 基本语法:v-on:事件名="事件执行函数",有三种常见的写法
// 1. v-on:事件名="单行函数"
// 2. v-on:事件名="无参数函数"
// 3. v-on:事件名="有参数函数(实参)"
// 也可以简写为@事件名
const count = ref(0);
function fn() {
// 在JavaScript中使用响应式对象需要使用value
count.value++;
}
const num = ref(5);
function add(n) {
console.log(n);
count.value += n;
}
</script>
<template>
<div>
<p>当前值为:{{ count }}</p>
<!-- 写法1 -->
<!-- 不在JavaScript中写的变量不需要带value -->
<button @click="count++">增加1</button>
<!-- 写法2 -->
<!-- 不需要参数的函数可以不需要带圆括号 -->
<button @click="fn">增加1</button>
<!-- 写法3 -->
<button @click="add(num)">增加{{ num }}</button>
<!-- 因为template标签中会自动对响应式对象进行解析,所以传参时不需要num.value,所以下面的写法是错误的 -->
<!-- <button @click="add(num.value)">增加{{ num }}</button> -->
</div>
</template>
|
条件渲染指令v-show和v-if
| Vue |
|---|
 1
 2
 3
 4
 5
 6
 7
 8
 9
10
11
12
13
14
15
16
17
18
19
20
21
22
23
24
25
26
27
28
29
30
31
32
33
34
35
36
37
38
39
40
41
42
43
44
45
46
47 | <script setup>
import { ref } from 'vue';
// v-show和v-if
// v-show和v-if都可以用来做条件渲染
// 但是v-if会直接删除DOM元素
// 而v-show只是控制元素CSS的display属性
// 二者的参数都是传递布尔表达式
const isVisible = ref(true);
// v-if与v-else/v-else-if配合还可以实现条件渲染
// 语法类似于if-else-if/if-else
// 需要注意,v-if或者v-else-if或者v-else必须保证作用于兄弟元素
// 而不能是父子元素
const isLogin = ref(true);
</script>
<template>
<div>
<!-- 控制元素显示与隐藏 -->
<!-- v-show -->
<div class="red" v-show="isVisible"></div>
<!-- v-if -->
<div class="green" v-if="isVisible"></div>
<!-- v-if -->
<span v-if="isLogin">请登录</span>
<!-- 注意,v-if和v-else之间不能有其他兄弟元素 -->
<span v-else>欢迎</span>
</div>
</template>
<style scoped>
.red,
.green {
width: 200px;
height: 200px;
}
.red {
background-color: red;
}
.green {
background-color: green;
}
</style>
|
案例1——切换图片
基本需求:
实现图片的翻页功能,一共两个按钮,点击图片左侧的“上一张”按钮翻到当前图片的上一张图片。点击图片右侧的“下一张”按钮翻到当前图片的下一张图片。需要注意,如果当前是第一张就必须禁用“上一张”,如果当前是最后一张就必须禁用“下一张”。不要实现循环播放,即第一张的上一张是最后一张,最后的一张的下一张是第一张
示例:

参考代码:
| Vue |
|---|
 1
 2
 3
 4
 5
 6
 7
 8
 9
10
11
12
13
14
15
16
17
18
19
20
21
22
23
24
25
26
27
28
29
30
31
32
33
34
35
36
37
38
39
40
41
42
43
44
45
46
47
48
49
50
51
52
53
54
55
56
57 | <script setup>
import { ref } from 'vue'
const imgList = [
'https://cxk-1305128831.cos.ap-beijing.myqcloud.com/11-00.gif',
'https://cxk-1305128831.cos.ap-beijing.myqcloud.com/11-01.gif',
'https://cxk-1305128831.cos.ap-beijing.myqcloud.com/11-02.gif',
'https://cxk-1305128831.cos.ap-beijing.myqcloud.com/11-03.gif',
'https://cxk-1305128831.cos.ap-beijing.myqcloud.com/11-04.png',
'https://cxk-1305128831.cos.ap-beijing.myqcloud.com/11-05.png'
];
// 控制下标,声明为响应式对象
const index = ref(0);
const isFirst = (i) => {
// 数组的第一个元素时隐藏
return i <= 0;
}
const isLast = (i) => {
// 数组的最后一个元素时隐藏
return i >= imgList.length - 1;
}
</script>
<template>
<div>
<!-- 上一张 -->
<!-- 数组的下标不是第一个元素时显示“上一张”按钮 -->
<button @click="index--" v-show="!isFirst(index)">上一张</button>
<img :src="imgList[index]">
<!-- 下一张 -->
<!-- 数组的下标不是最后一个元素时显示“下一张”按钮 -->
<button @click="index++" v-show="!isLast(index)">下一张</button>
</div>
</template>
<style scoped>
#app {
display: flex;
width: 500px;
height: 240px;
}
img {
width: 240px;
height: 240px;
}
#app div {
flex: 1;
display: flex;
justify-content: center;
align-items: center;
}
</style>
|
列表渲染指令v-for
| Vue |
|---|
 1
 2
 3
 4
 5
 6
 7
 8
 9
10
11
12
13
14
15
16
17
18
19
20
21
22
23
24
25
26
27
28
29
30
31
32
33
34
35
36
37
38
39
40
41
42
43
44
45
46
47
48
49
50
51
52
53
54
55
56
57
58
59
60
61
62
63
64
65
66
67
68
69
70 | <script setup>
// v-for指令,可以用于循环生成某一个标签及其子标签
// 即需要循环生成哪一个标签,就在哪一个标签上写v-for
// 基本语法:(参数1, 参数2) in 数组/对象/数字
// 其中参数1,表示值,参数2表示下标
// 如果只有一个参数1,那么可以省略圆括号
// 需要注意的是,声明在v-for中的参数1和参数2都只在当前标签及其子标签内可用,对于其兄弟标签或者父亲标签都不可见
// 数字数组
const arr = [1, 2, 3, 4];
// 对象数组
const objArr = [
{
id: 1, name: "zhangsan"
},
{
id: 2, name: "lisi"
},
{
id: 3, name: "wangwu"
}
];
// 对象
const obj = {
name: "zhaoliu",
age: 16
}
</script>
<template>
<div>
<!-- 遍历数字数组 -->
<ul>
<!-- 只使用第一个参数,不需要带括号 -->
<li v-for="num in arr">
{{ num }}
</li>
<!-- 使用两个参数时需要带括号 -->
<li v-for="(num, index) in arr">
{{ num }} : {{ index }}
</li>
</ul>
<!-- 遍历对象数组 -->
<div>
<!-- 遍历对象数组时,第一个参数拿出来的是一个对象 -->
<div v-for="(value, index) in objArr">
{{ value.id }} - {{ value.name }} : {{ index }}
</div>
</div>
<!-- 遍历对象 -->
<ul>
<!-- 对象比较特殊,有三个参数,注意第一个参数为值而不是键,需要与原生JS的for-in做区分 -->
<li v-for="(value, key, index) in obj">
{{ value }} - {{ key }} - {{ index }}
</li>
</ul>
<!-- 遍历数字 -->
<ul>
<!-- 遍历数字时就相当于生成指定个数个标签 -->
<!-- 第一个参数从1开始计数,一直到指定数字 -->
<!-- 第二个参数从0开始,表示下标 -->
<li v-for="(num, index) in 10">
{{ num }} : {{ index }}
</li>
</ul>
</div>
</template>
|
案例2——书架
基本需求:
- 动态渲染书本列表
- 删除功能:点击删除按钮可以删除当前列表项
示例:
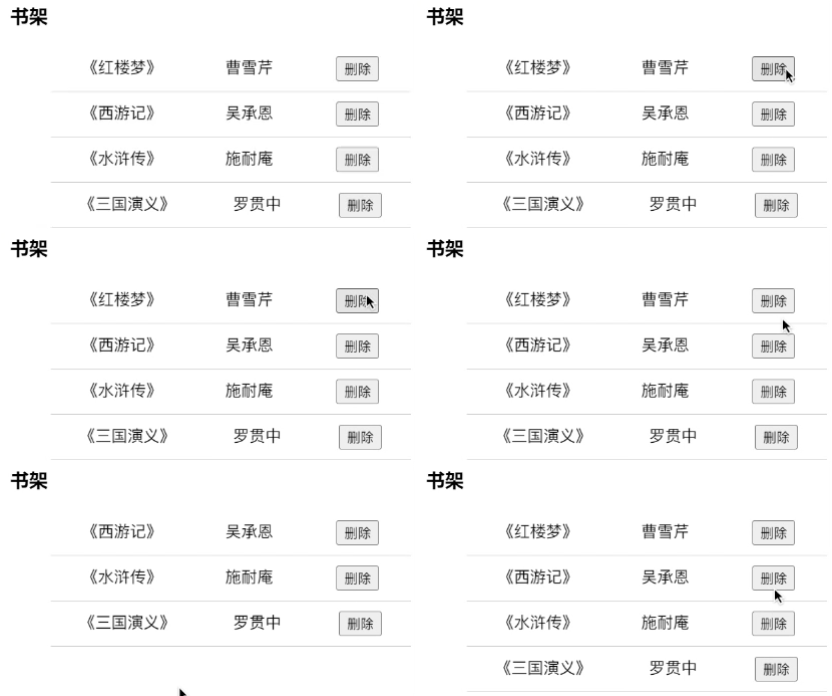
参考代码:
| Vue |
|---|
 1
 2
 3
 4
 5
 6
 7
 8
 9
10
11
12
13
14
15
16
17
18
19
20
21
22
23
24
25
26
27
28
29
30
31
32
33
34
35
36
37
38
39
40
41
42
43
44
45
46 | <script setup>
import { ref } from "vue";
// 图书列表
// 修改数据->影响视图,声明为响应式
const bookList = ref([
{ id: 1, name: '《红楼梦》', author: '曹雪芹' },
{ id: 2, name: '《西游记》', author: '吴承恩' },
{ id: 3, name: '《⽔浒传》', author: '施耐庵' },
{ id: 4, name: '《三国演义》', author: '罗贯中' }
]);
function del(index) {
// 删除当前位置的1个元素
bookList.value.splice(index, 1);
}
</script>
<template>
<h3>书架</h3>
<ul>
<!-- 使用v-for渲染数组 -->
<li v-for="(book, index) in bookList">
<!-- v-for会生成当前标签和及其子标签 -->
<!-- 并且v-for的参数在子标签中均可用 -->
<span>{{ book.name }}</span>
<span>{{ book.author }}</span>
<!-- 点击删除时从数组中删除对应的书籍 -->
<!-- 使用v-for的第二个参数识别当前是哪一个列表项 -->
<button @click="del(index)">删除</button>
</li>
</ul>
</template>
<!-- 这个style不要添加scoped属性,因为要修饰id为app的盒子,这个id并不在当前的文件中 -->
<style>
#app {
width: 400px;
margin: 100px auto;
}
ul li {
display: flex;
justify-content: space-around;
padding: 10px 0;
border-bottom: 1px solid #ccc;
}
</style>
|
结合key的v-for——结合书架案例
对比:
没使用key:

使用key:
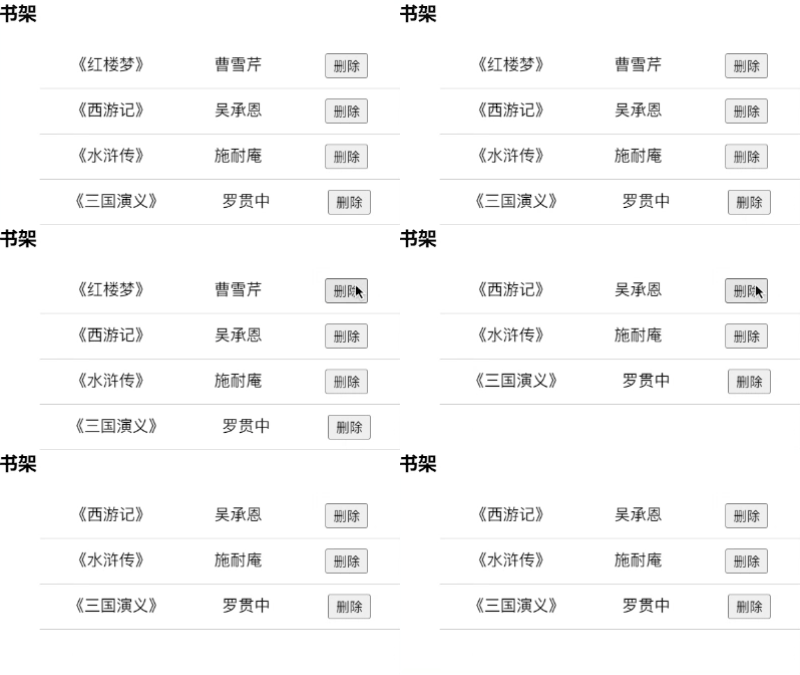
原理:为v-for所在标签动态绑定key,因为Vue会尽可能得复用DOM,从而提高整体的性能,而v-for在列表更新时需要涉及到重新渲染,如果节点改变太多,那么可以复用的DOM节点就会很少,从而导致需要额外处理节点的新增
根据这个原理,为了尽可能保证渲染性能,需要为v-for所在标签绑定一个唯一值作为key的属性值,这样只要这个key不变,那么Vue就会认为这个节点没有改变,从而复用这个DOM节点
Note
key的类型一般为数字或者字符串,不建议使用其他类型
参考代码:
| Vue |
|---|
 1
 2
 3
 4
 5
 6
 7
 8
 9
10
11
12
13
14
15
16
17
18
19
20
21
22
23
24
25
26
27
28
29
30
31
32
33
34
35
36
37
38
39
40
41
42
43
44 | <script setup>
import { ref } from "vue";
// 图书列表
// 修改数据->影响视图,声明为响应式
const bookList = ref([
{ id: 1, name: '《红楼梦》', author: '曹雪芹' },
{ id: 2, name: '《西游记》', author: '吴承恩' },
{ id: 3, name: '《⽔浒传》', author: '施耐庵' },
{ id: 4, name: '《三国演义》', author: '罗贯中' }
]);
function del(index) {
// 删除当前位置的1个元素
bookList.value.splice(index, 1);
}
</script>
<template>
<h3>书架</h3>
<ul>
<!-- 在v-for所在标签添加:key -->
<!-- 使用id作为key的值,如果没有比id更合适作为key的值,再考虑用下标 -->
<li v-for="(book, index) in bookList" :key="book.id">
<span>{{ book.name }}</span>
<span>{{ book.author }}</span>
<button @click="del(index)">删除</button>
</li>
</ul>
</template>
<style>
#app {
width: 400px;
margin: 100px auto;
}
ul li {
display: flex;
justify-content: space-around;
padding: 10px 0;
border-bottom: 1px solid #ccc;
}
</style>
|
双向绑定v-model
之前都是数据驱动视图,但是有的时候需要保证数据驱动视图的同时还要做到视图驱动数据,此时就需要双向绑定指令,即数据<->视图。一般会在表单元素中使用
| Vue |
|---|
 1
 2
 3
 4
 5
 6
 7
 8
 9
10
11
12
13
14
15
16
17
18
19
20
21
22
23 | <script setup>
// 基本语法:在指定元素上使用v-model,其值为需要绑定的响应式数据
import { reactive } from 'vue';
const loginForm = reactive({
username: "",
password: ""
})
</script>
<template>
<div>
<!-- 在姓名输入框中绑定username -->
姓名:<input type="text" v-model="loginForm.username"><br /><br />
<!-- 在密码输入框中绑定password -->
密码:<input type="text" v-model="loginForm.password"><br /><br />
<button>提交</button>
</div>
</template>
<style scoped></style>
|
案例3——记事本
基本功能:
- 动态渲染记事本的任务
- 添加任务:根据用户输入的任务添加到列表中,注意,空字符串以及字符串首尾空格不能插入到列表中,拓展:添加完成后清空输入框
- 删除任务:用户点击任务列表右侧的删除按钮删除当前列表项
- 清空任务:用户点击“清空任务”按钮即可删除所有任务
- 统计任务:根据用户当前任务的个数计算出总数结果
示例:
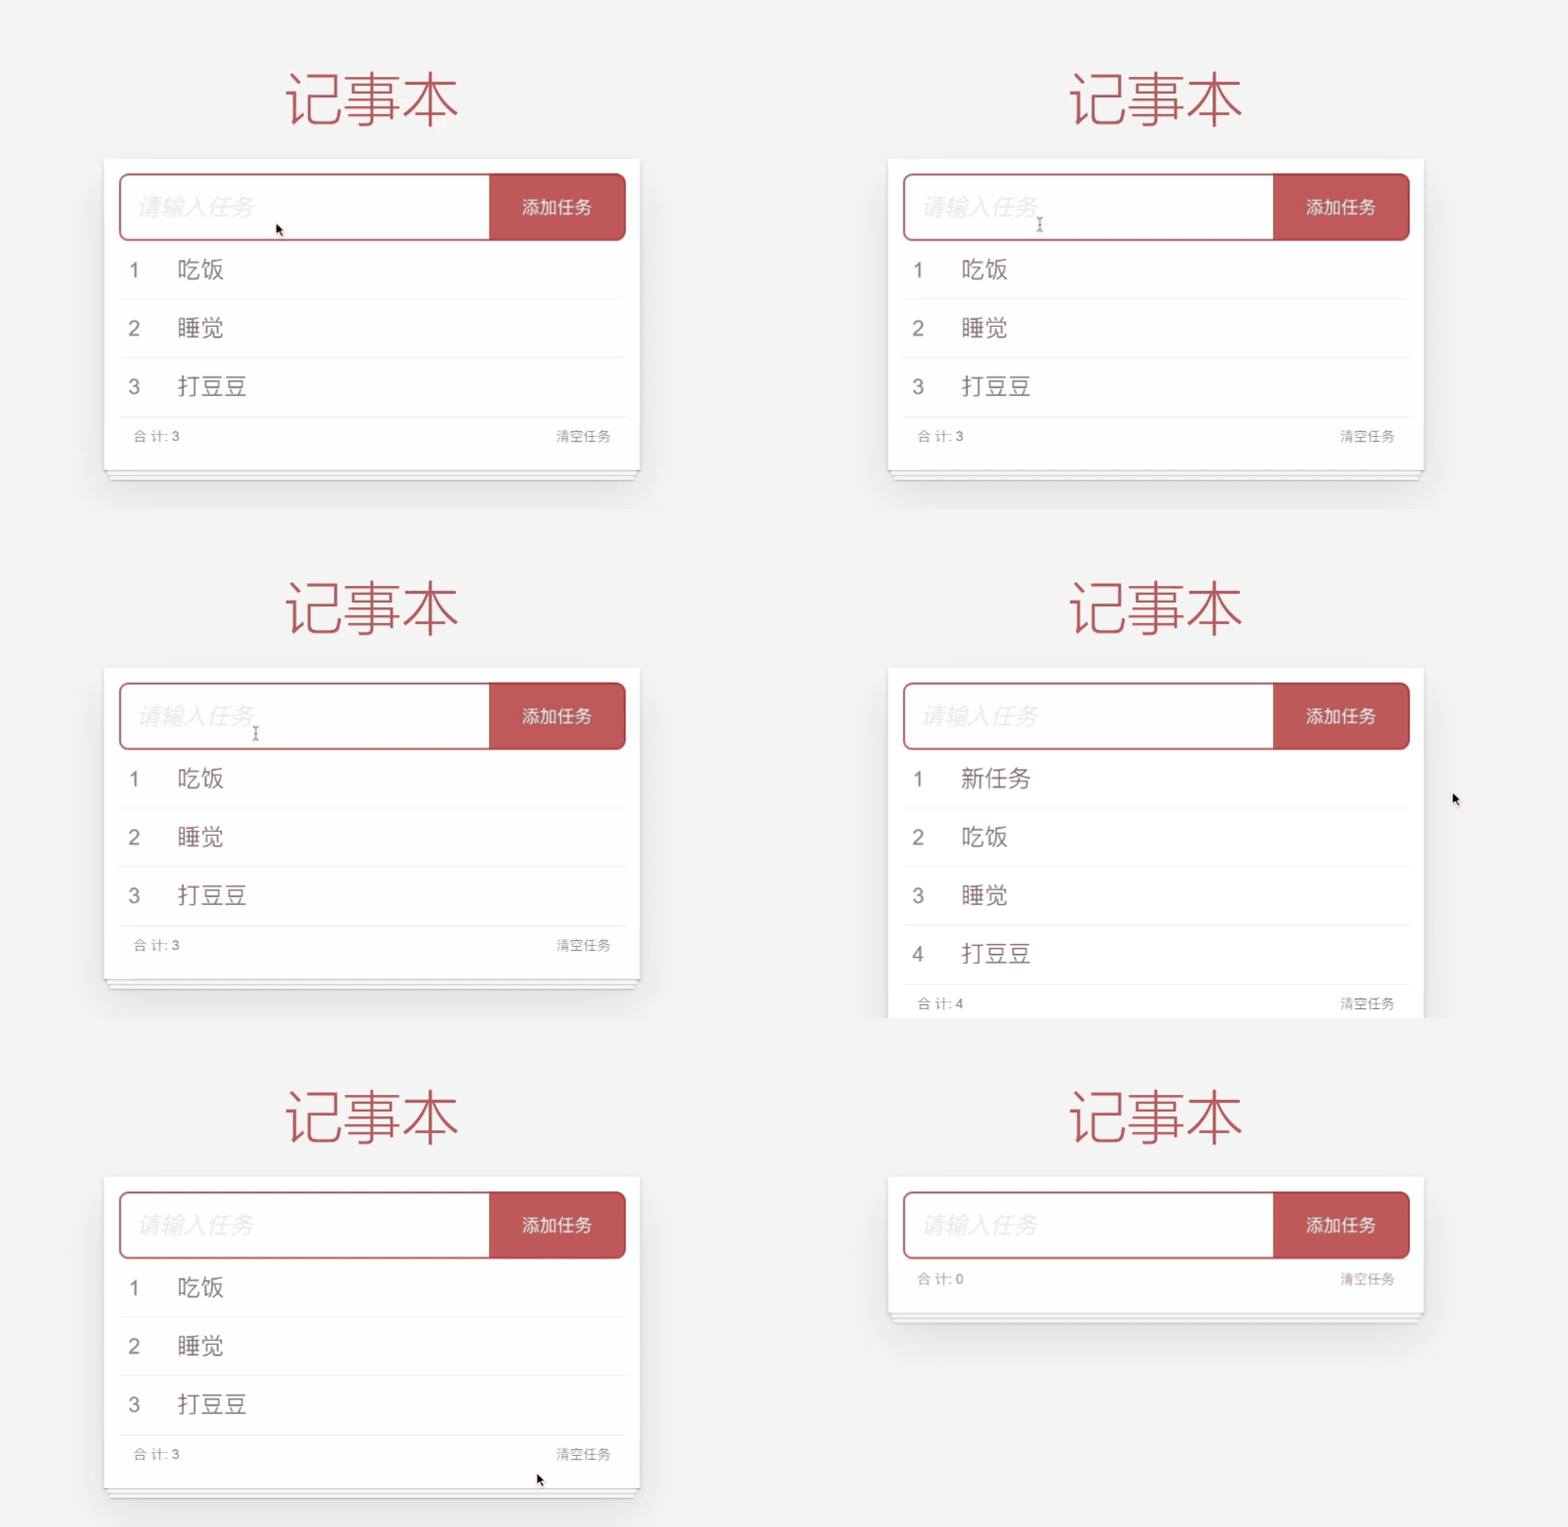
参考代码:
| Vue |
|---|
 1
 2
 3
 4
 5
 6
 7
 8
 9
10
11
12
13
14
15
16
17
18
19
20
21
22
23
24
25
26
27
28
29
30
31
32
33
34
35
36
37
38
39
40
41
42
43
44
45
46
47
48
49
50
51
52
53
54
55
56
57
58
59
60
61
62
63
64
65
66
67
68
69
70
71
72
73 | <script setup>
// 导入样式
import './assets/style/index.css';
import { ref } from 'vue';
// 待办任务列表
// 数组声明为响应式对象
const todoList = ref([
{ id: 321, name: '吃饭', finished: false },
{ id: 666, name: '睡觉', finished: true },
{ id: 195, name: '打豆豆', finished: false }
]);
// 2. 添加任务
// 使用双向绑定获取到输入框的数据
const task = ref("");
function addTask(t) {
if (t == "")
return
// 去除首尾空格
t = t.trim();
todoList.value.unshift({ id: Date.now(), name: t, finished: false });
// 添加完成后清空输入框
task.value = "";
}
// 3. 删除任务
// 根据id删除,不建议根据数字元素下标删除,因为一般来讲内容都是来自后端,后端只能给id,无法提供下标
function del(id) {
// 使用过滤方法,让不等于当前要删除的id的元素留下
todoList.value = todoList.value.filter((item) => item.id != id)
}
</script>
<template>
<section clsss="todoapp">
<header class="header">
<h1>记事本</h1>
<!-- 输入任务 -->
<input v-model="task" placeholder="请输入任务" class="new-todo" />
<!-- 添加任务 -->
<button @click="addTask(task)" class="add">添加任务</button>
</header>
<section class="main">
<ul class="todo-list">
<!-- 1. 先动态生成数据 -->
<li class="todo" v-for="(list, index) in todoList" :key="list.id">
<div class="view">
<!-- 序号 -->
<span class="index">{{ index + 1 }}</span>
<!-- 描述文字 -->
<label>{{ list.name }}</label>
<!-- 删除 -->
<button @click="del(list.id)" class="destroy"></button>
</div>
</li>
</ul>
</section>
<footer class="footer">
<!-- 统计总数 -->
<!-- 4. 统计任务,直接获取数组长度即可 -->
<span class="todo-count">合 计: <strong>{{ todoList.length }}</strong></span>
<!-- 清空 -->
<!-- 3. 清空任务,直接将数组赋值为空数组即可,或者改变数组的长度为0 -->
<button class="clear-completed" @click="todoList.length = 0">清空任务</button>
<!-- <button class="clear-completed" @click="todoList = []">清空任务</button> -->
</footer>
</section>
</template>
|
按键修饰符
| Vue |
|---|
 1
 2
 3
 4
 5
 6
 7
 8
 9
10
11
12
13
14
15
16
17
18
19
20
21
22
23
24
25 | <script setup>
function onKeyDown() {
console.log("Enter键按下");
}
function onMutipleKeyDown() {
console.log("ctrl+shift键按下");
}
</script>
<template>
<div>
<!-- 按键修饰符 -->
<!-- 按键本身也是一种事件,例如键盘按下keydown和抬起keyup -->
<!-- 但是直接使用keydown或者keyup,就会出现不论是什么按键都会触发keydown或者keyup,例如: -->
<!-- <input type="text" @keydown="onKeyDown"> -->
<!-- 所以为了解决这个问题,可以对事件进行修饰,让其在指定条件下才能执行 -->
<!-- 例如,在keydown中可以使用.enter修饰符,表示只有enter按下时才会触发keydown事件 -->
<!-- <input type="text" @keydown.enter="onKeyDown"> -->
<!-- 如果想要使用组合键,那么就需要使用修饰符链式调用 -->
<!-- 例如,按下ctrl+shift触发按下事件可以写成: -->
<!-- <input type="text" @keydown.ctrl.shift="onMutipleKeyDown"> -->
<!-- 但是上面的写法存在一个问题,如果按下了ctrl+任意键+shift或者其他只要包含了ctrl+shift的组合键也会触发keydown事件 -->
<!-- 所以为了解决这种模糊匹配问题,就需要使用到.exact,表示精确匹配 -->
<input type="text" @keydown.ctrl.shift.exact="onMutipleKeyDown">
</div>
</template>
|
事件修饰符
| Vue |
|---|
 1
 2
 3
 4
 5
 6
 7
 8
 9
10
11
12
13
14
15
16
17
18
19
20
21
22
23
24
25
26
27
28
29
30
31
32
33
34
35
36
37
38
39
40
41
42
43
44
45
46
47
48
49 | <script setup>
function clickOnP() {
console.log('clickOnP');
}
function clickOnDiv() {
console.log('clickOnDiv');
}
function clickOna() {
console.log('clickOna');
}
</script>
<template>
<!-- 事件修饰符 -->
<!-- 在HTML中有些标签存在自己的默认行为,例如a标签会在点击后跳转 -->
<!-- 为了避免一些标签的默认行为,就需要用到阻止默认行为的修饰符.prevent -->
<!-- <a href="https://www.baidu.com" @click.prevent>百度一下</a> -->
<!-- 除了阻止标签的默认行为以外,还有阻止冒泡行为 -->
<!-- 例如,点击下面的p标签,既会触发p的click事件,也会触发div的click事件 -->
<!-- <div @click="clickOnDiv">
<p @click="clickOnP">
</p>
</div> -->
<!-- 如果需要阻止p标签的冒泡行为,就可以使用.stop -->
<!-- <div @click="clickOnDiv">
<p @click.stop="clickOnP">
</p>
</div> -->
<!-- 如果想要同时阻止冒泡和默认行为,可以使用链式调用: -->
<div @click="clickOnDiv">
<a href="https://www.baidu.com" @click.stop.prevent="clickOna">百度一下
</a>
</div>
</template>
<style scoped>
div {
width: 200px;
height: 200px;
background-color: blue;
}
p {
width: 100px;
height: 100px;
background-color: pink;
}
</style>
|
v-model修饰符
| Vue |
|---|
 1
 2
 3
 4
 5
 6
 7
 8
 9
10
11
12
13
14
15
16
17
18
19
20
21
22
23 | <script setup>
import { ref } from "vue";
const msg = ref("");
const count = ref("");
const lazyMsg = ref("");
</script>
<template>
<div>
<!-- v-model拓展修饰符 -->
<!-- 在获取表单数据时,有的时候会遇到一些不希望出现的情况,例如下面三种情况: -->
<!-- 1. 存在首尾空格的字符串:" apple " -->
<!-- 2. 需要的结果是数字,但是默认输入框获取到的值是字符串 -->
<!-- 3. 用户输入的同时刷新获取到的数据 -->
<!-- 对于这三种情况,分别有对应的修饰符解决: -->
<!-- 1. 使用.trim去除输入内容的首尾空格 -->
输入内容:<input type="text" v-model.trim="msg">
<!-- 2. 使用.number尽可能将输入框中的字符串转换成数字 -->
输入内容:<input type="text" v-model.number="count">
<!-- .number的作用类似于原生JavaScript的parse家族函数 -->
<!-- 3. 使用.lazy确保当前输入框失去焦点时再同步数据 -->
输入内容:<input type="text" v-model.lazy="lazyMsg">
</div>
</template>
|
v-model与其他表单元素
| Vue |
|---|
 1
 2
 3
 4
 5
 6
 7
 8
 9
10
11
12
13
14
15
16
17
18
19
20
21
22
23
24
25
26
27
28
29
30
31
32
33
34
35
36
37
38
39
40
41
42
43
44
45
46
47
48
49 | <script setup>
import { ref } from "vue";
const textareaMsg = ref("");
// const selectMsg = ref("");
// 可以给定默认值
const selectMsg = ref("1");
const radioMsg = ref("");
const checkboxMsgSingle = ref("");
const checkboxMsgMutiple = ref("");
const checkboxMsgMutiple1 = ref([]);
</script>
<template>
<div>
<!-- v-model与其他表单元素 -->
<!-- 前面提到了v-model一般和表单元素相关联,并且举例使用的是text的input -->
<!-- v-model之所以可以从input:text中获取到数据本质就是读取对应的value属性 -->
<!-- 对于其他的表单元素,总结如下: -->
<!-- 文本域textarea:读取value属性值 -->
<textarea v-model="textareaMsg"></textarea>
<!-- 下拉框:将v-model写在select上方,读取option的value属性(需要手动指定) -->
<select v-model="selectMsg">
<option value="1">1</option>
<option value="2">2</option>
<option value="3">3</option>
</select>
<!-- 单选框:v-model绑定一个变量,读取选中的单选框的value属性(需要手动指定) -->
<!-- 需要注意,在HTML部分提到如果要实现单选效果必须要有name属性,但是在vue只要使用了v-model就可以确保实现单选效果,因为所有绑定到同一个数据源的单选框自动形成一个组,并且由于 radioMsg 同一时间只能保存一个值,所以自然形成了单选效果 -->
<input type="radio" value="stu" v-model="radioMsg">学生
<input type="radio" value="tea" v-model="radioMsg">老师
<input type="radio" value="master" v-model="radioMsg">校长
<input type="radio" value="boss" v-model="radioMsg">教导主任
<!-- 复选框: 1. 只有一个复选框,只读取其中的checked属性 2. 存在多个复选框,v-model需要绑定一个数组,并读取每一个复选框的value属性(需要手动指定) -->
<!-- 只有一个复选框的时候 -->
<input type="checkbox" v-model="checkboxMsgSingle">是否同意协议
<!-- 存在多个复选框 -->
<!-- 如果存在多个复选框但是绑定的是一个变量,此时选中任意一个都会出现全选,否则就是全不选 -->
<input type="checkbox" v-model="checkboxMsgMutiple" value="running">跑步
<input type="checkbox" v-model="checkboxMsgMutiple" value="jumping">跳远
<input type="checkbox" v-model="checkboxMsgMutiple" value="scoping">跳绳
<input type="checkbox" v-model="checkboxMsgMutiple" value="soccer">足球
<input type="checkbox" v-model="checkboxMsgMutiple" value="basketball">篮球
<!-- 绑定数组 -->
<input type="checkbox" v-model="checkboxMsgMutiple1" value="running">跑步
<input type="checkbox" v-model="checkboxMsgMutiple1" value="jumping">跳远
<input type="checkbox" v-model="checkboxMsgMutiple1" value="scoping">跳绳
<input type="checkbox" v-model="checkboxMsgMutiple1" value="soccer">足球
<input type="checkbox" v-model="checkboxMsgMutiple1" value="basketball">篮球
</div>
</template>
|
样式绑定
class样式绑定
| Vue |
|---|
 1
 2
 3
 4
 5
 6
 7
 8
 9
10
11
12
13
14
15
16
17
18
19
20
21
22
23
24
25
26
27
28
29
30
31
32
33
34
35
36
37
38
39 | <script setup>
import { ref } from "vue";
const isTrue = ref(true);
const isTrue1 = ref(true);
const isTrue2 = ref(true);
const isTrue3 = ref(true);
</script>
<template>
<div>
<!-- class样式绑定 -->
<!-- class样式绑定有两种写法: -->
<!-- 1. :class="三元表达式",此时三元表达式的值就是class实际获得的名称 -->
<!-- 2. :class="对象",此时对象对应值的真假就是class实际获得的名称 -->
<!-- 三元表达式,条件为真即可使用box1类名,否则不给定任何类名,注意不要遗忘单引号 -->
<!-- <div :class="isTrue ? 'box1' : ''">这是一个普通的盒子</div> -->
<!-- 对象,对象中的key即为类名,value即为布尔值,注意对象中的key不要带引号,就是正常声明对象的方式 -->
<!-- <div :class="{ box1: isTrue1, box2: isTrue2, box3: isTrue3 }">这是一个普通的盒子</div> -->
<!-- 静态class和动态class:相同样式会遵循「后来者居上」,不同样式会合并 -->
<div class="box1" :class="{ box2: isTrue1, box4: isTrue2 }">这是一个普通的盒子</div>
</div>
</template>
<style scoped>
.box1 {
background-color: green;
}
.box2 {
color: red;
}
.box3 {
font-size: 50px;
}
.box4 {
background-color: springgreen;
}
</style>
|
案例4——京东Tab切换
基本需求:
- 默认情况下,“京东秒杀”为红色
- 根据点击的标签确定红色的栏目
示例:

参考代码:
| Vue |
|---|
 1
 2
 3
 4
 5
 6
 7
 8
 9
10
11
12
13
14
15
16
17
18
19
20
21
22
23
24
25
26
27
28
29
30
31
32
33
34
35
36
37
38
39
40
41
42
43
44
45
46
47
48
49
50
51
52
53
54
55
56 | <script setup>
import { ref } from "vue";
// tabs 列表
const tabs = [
{ id: 1, name: '京东秒杀' },
{ id: 2, name: '每日特价' },
{ id: 3, name: '品类秒杀' }
]
// 默认京东秒杀
const currIndex = ref(0);
</script>
<template>
<!-- 1. 动态渲染 -->
<div>
<ul>
<li v-for="(tab, index) in tabs" :key="tab.id">
<!-- 2. 实现思路:点击时获取当前点击的小标,激活实际小标等于当前下标的列表 -->
<a :class="{active: currIndex === index }" @click="currIndex = index" href="#">{{ tab.name }}</a>
</li>
</ul>
</div>
</template>
<style>
* {
margin: 0;
padding: 0;
}
ul {
display: flex;
border-bottom: 2px solid #e01222;
padding: 0 10px;
}
li {
width: 100px;
height: 50px;
line-height: 50px;
list-style: none;
text-align: center;
}
li a {
display: block;
text-decoration: none;
font-weight: bold;
color: #333333;
}
li a.active {
background-color: #e01222;
color: #fff;
}
</style>
|
style样式绑定
| Vue |
|---|
 1
 2
 3
 4
 5
 6
 7
 8
 9
10
11
12
13
14
15 | <script setup>
import { ref } from "vue";
const c = ref("red");
const b = ref("green");
</script>
<template>
<div>
<!-- style样式绑定 -->
<!-- style样式绑定是针对于行内样式而言,基本语法就是在双引号内部写一个对象,即:style="{}" -->
<!-- 其中,对象中的key即为样式名称,value即为样式值 -->
<p :style="{color: c}">这是一个p标签</p>
<!-- 需要注意,如果key为使用了-连接符的样式名,需要改成大驼峰的形式,不论是在template中还是script中都是一样 -->
<p :style="{backgroundColor: b}">这是一个p标签</p>
</div>
</template>
|
案例5——进度条案例
基本需求:根据按钮的百分比设置当前进度条的填充进度
示例:

参考代码:
| Vue |
|---|
 1
 2
 3
 4
 5
 6
 7
 8
 9
10
11
12
13
14
15
16
17
18
19
20
21
22
23
24
25
26
27
28
29
30
31
32
33
34
35
36
37
38
39
40
41
42
43
44
45
46
47
48
49 | <script setup>
import { ref } from "vue";
const percent = ref("");
function fn(p) {
// 直接拼接%便于处理
percent.value = p + "%";
}
</script>
<template>
<div class="progress">
<div class="inner" :style="{width: percent}">
<span>{{ percent }}</span>
</div>
</div>
<button @click="fn(25)">设置25%</button>
<button @click="fn(50)">设置50%</button>
<button @click="fn(75)">设置75%</button>
<button @click="fn(100)">设置100%</button>
</template>
<style>
.progress {
height: 25px;
width: 400px;
border-radius: 15px;
background-color: #272425;
border: 3px solid #272425;
box-sizing: border-box;
margin-bottom: 30px;
}
.inner {
height: 20px;
border-radius: 10px;
text-align: right;
position: relative;
background-color: #409eff;
background-size: 20px 20px;
box-sizing: border-box;
transition: all 1s;
}
.inner span {
position: absolute;
right: -25px;
bottom: -25px;
}
</style>
|
计算属性
基本概念
| Vue |
|---|
 1
 2
 3
 4
 5
 6
 7
 8
 9
10
11
12
13
14
15
16
17
18
19 | <script setup>
import { computed, ref } from "vue";
// 计算属性,即通过某种计算方式得到一种结果,例如获取数组中元素之和
const arr = ref([1, 2, 3, 4, 5]);
// 基本语法:使用computed函数
// 该函数需要传递一个回调函数,回调函数中就是计算逻辑以及返回计算结果,该函数的返回值就是计算属性的对象,所以在script中使用计算属性的返回值需要同样使用.value
// 例如,在下面的例子中,sum就是通过计算arr数组中每一个数字的加和得到的结果,这种情况下,也称arr数组的元素为sum的依赖
// 一旦数组中的元素发生变化,计算属性的结果也会发生变化
const sum = computed(() => {
// 累积数组的和
return arr.value.reduce((a, b) => a + b);
});
</script>
<template>
<div>
数组元素的和为{{ sum }}
</div>
</template>
|
计算属性与普通计算函数的区别
| Vue |
|---|
 1
 2
 3
 4
 5
 6
 7
 8
 9
10
11
12
13
14
15
16
17
18
19
20
21
22
23
24
25
26
27
28
29
30
31
32 | <!-- 计算属性和普通计算函数的区别 -->
<!-- 计算属性会存在结果缓存,也就是说,一旦第一次计算出结果后,就不会再次计算,而是直接从缓存中获取结果,除非依赖发生改变 -->
<!-- 而普通计算函数会根据调用次数执行对应的次数,尽管依赖不改变 -->
<script setup>
import { computed, ref } from "vue";
const arr = ref([1, 2, 3, 4, 5]);
// 计算属性
const sum1 = computed(()=>{
console.log('计算属性执行');
return arr.value.reduce((a, b)=> a + b);
})
// 普通函数
function fn() {
console.log('普通函数执行');
return arr.value.reduce((a, b) => a + b);
}
</script>
<template>
<div>
<!-- 执行一次计算属性 -->
计算属性:{{ sum1 }}
计算属性:{{ sum1 }}
计算属性:{{ sum1 }}
<hr>
<!-- 执行三次普通函数 -->
普通函数:{{ fn() }}
普通函数:{{ fn() }}
普通函数:{{ fn() }}
</div>
</template>
|
计算属性的简易写法和完整写法
| Vue |
|---|
 1
 2
 3
 4
 5
 6
 7
 8
 9
10
11
12
13
14
15
16
17
18
19
20
21
22
23
24
25
26
27
28
29
30
31
32
33
34
35
36
37
38
39
40 | <!-- 计算属性完整写法和简易写法 -->
<!-- 前面使用的计算属性都是简易写法,这种写法获取到的值是只读的,如果尝试修改就会报出警告 -->
<!-- 但是有时又需要修改这个计算属性,例如绑定了v-model的input输入框的默认值是通过计算属性得到的,但是输入框接着修改时会触发v-model从而去修改计算属性的值 -->
<!-- 这种情况下就需要使用到完整写法 -->
<script setup>
import { ref, computed } from "vue";
// 计算属性的简易写法
// const 变量 = computed(()=> return 计算结果)
// 计算属性的完整写法
/**
* const 变量 = computed({
* get(){
* return 计算结果;
* }
*
* set(val) {
* 对val进行处理
* }
* })
*/
// 在完整写法中,如果不写set方法,那么完整写法等价于get方法
// 其中set方法的val即为计算属性的新值
const msg1 = computed({
get(){
// 默认输入框的值
return "默认值";
},
set(val) {
// 获取到修改的值
console.log(val);
}
});
</script>
<template>
<div>
<input type="text" v-model="msg1">
</div>
</template>
|
案例6——全选与反选
基本需求:
- 点击全选时,所有列表全部勾选
- 单独勾选全部按钮时,自动勾选全选按钮
- 点击反选时,和现有选择的结果相反
示例:
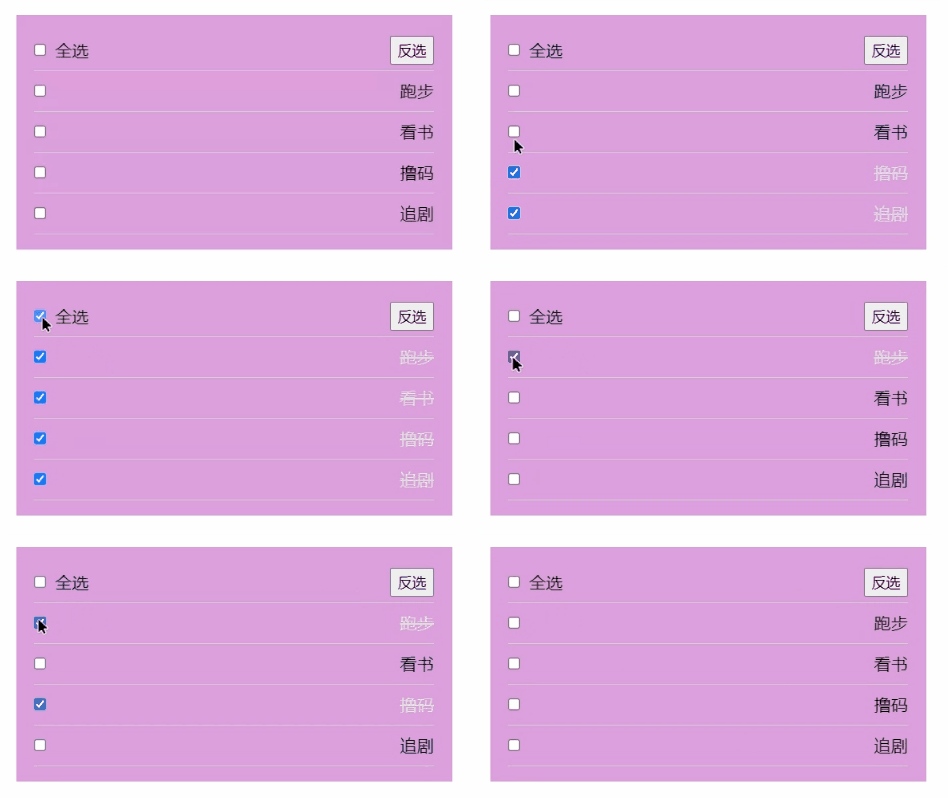
参考代码:
| Vue |
|---|
  1
  2
  3
  4
  5
  6
  7
  8
  9
 10
 11
 12
 13
 14
 15
 16
 17
 18
 19
 20
 21
 22
 23
 24
 25
 26
 27
 28
 29
 30
 31
 32
 33
 34
 35
 36
 37
 38
 39
 40
 41
 42
 43
 44
 45
 46
 47
 48
 49
 50
 51
 52
 53
 54
 55
 56
 57
 58
 59
 60
 61
 62
 63
 64
 65
 66
 67
 68
 69
 70
 71
 72
 73
 74
 75
 76
 77
 78
 79
 80
 81
 82
 83
 84
 85
 86
 87
 88
 89
 90
 91
 92
 93
 94
 95
 96
 97
 98
 99
100
101
102
103
104
105 | <!-- 全选与反选 -->
<script setup>
import { ref, computed } from 'vue';
// 计划列表
const planList = ref([
{ id: 12, name: '跑步', done: false },
{ id: 76, name: '看书', done: false },
{ id: 31, name: '撸码', done: false },
{ id: 49, name: '追剧', done: false }
]);
// 所有选项全部勾选时,全选被勾选,或者点击全选,所有选项全部勾选
// ps:不要只想着通过all的值控制每一项的done,可以试试反着执行,即通过done是否全选控制all的值
// 使用计算属性控制all的值
// const all = computed(()=>{
// return planList.value.every(i => i.done);
// })
// 但是,使用上面的简写方式会发现,如果全选的值为true之后再修改为false就会警告,所以这里需要用到完整写法
const all = computed({
get() {
return planList.value.every(i => i.done);
},
set(val) {
// ps:有的时候思考一下修改数组所有元素也是一种思路
// 修改数组中done的值
planList.value.forEach(i => i.done = val);
}
})
// 反选
// 即选择的不选,不选的选
function fn() {
// 当前结果取个反再赋值给当前变量
planList.value.forEach(i => i.done = !i.done);
}
</script>
<template>
<p>
<span>
<input type="checkbox" id="all" v-model="all" />
<label for="all">全选</label>
</span>
<button @click="fn">反选</button>
</p>
<ul>
<!-- 1. 动态渲染 -->
<li v-for="plan in planList" :key="plan.id">
<!-- 2. 绑定单选框和完成样式,最关键的一步!!!-->
<input type="checkbox" v-model="plan.done" />
<span :class="{completed:plan.done}">{{ plan.name }}</span>
</li>
</ul>
</template>
<style lang="scss">
* {
margin: 0;
padding: 0;
}
ul {
list-style: none;
}
#app {
width: 400px;
margin: 100px auto;
padding: 15px 18px;
background: plum;
p {
display: flex;
justify-content: space-between;
align-items: center;
height: 40px;
border-bottom: 1px solid #ccc;
button {
padding: 3px 6px;
}
input {
margin-right: 8px;
}
}
ul {
li {
display: flex;
justify-content: space-between;
align-items: center;
height: 40px;
border-bottom: 1px solid #ccc;
span.completed {
color: #ddd;
text-decoration: line-through;
}
}
}
}
</style>
|
侦听器(监听器)
| Vue |
|---|
 1
 2
 3
 4
 5
 6
 7
 8
 9
10
11
12
13
14
15
16
17
18
19
20
21
22
23
24
25
26
27
28
29
30
31
32
33
34
35
36
37
38
39
40
41
42
43
44
45
46
47
48
49
50
51
52
53
54
55
56
57
58
59
60
61
62
63
64
65
66
67
68
69
70
71
72 | <script setup>
import { reactive, ref, watch } from "vue";
// watch函数,用于监听响应式数据的变化
// 该函数传递两个参数
// 第一个参数是需要监听的响应式数据
// 第二个参数是一个回调函数,这个回调函数也有两个参数,第一个参数表示改变后的新数据,第二个参数表示改变前的旧数据
const count = ref(10);
watch(count, (newVal, oldVal)=>{
console.log(newVal, oldVal);
})
// 需要注意,watch如果监听的是ref数据,默认是潜监听
// 所谓潜监听,就是只会监听当前变量的地址对应的内容,对于原始数据类型来说,就是监听的变量的值,但是对于对象来说,只有对象变为一个新对象时才会触发watch的回调函数
const obj = ref({
name: "张三",
age: 18
});
watch(obj, (newVal, oldVal)=>{
console.log(newVal, oldVal);
})
// 所以如果想要watch监听到对象内部的属性改变就需要开启深度监听
// 需要在watch的第三个参数中传递一个对象,对象中有一个属性:deep,值为布尔类型
watch(obj, (newVal, oldVal) => {
// 需要注意,打印对象时,旧值和新值一样是正常的,因为监听的是地址,同一个地址获取到的值自然就是一样的
console.log(newVal, oldVal);
}, {
deep: true
})
// 但是,如果对象是使用reactive的,那么默认就是深度监听
const obj1 = reactive({
name: "lisi",
age: 20
})
watch(obj1, (newVal, oldVal)=>{
console.log(newVal, oldVal);
})
// 立即执行监听
// 默认情况下,监听只有在监听对象发生变化时才会执行回调函数,但是有时需要在创建监听器时就执行一次回调
// 此时就可以使用第三个参数中的immediate属性
const count1 = ref(15);
watch(count1, (newVal, oldVal)=>{
console.log(newVal, oldVal); // 15 undefined
},{
immediate: true
})
// 如果只想让监听器只监听一次,就可以使用第三个参数中的once属性
const count2 = ref(30);
watch(count2, (newVal, oldVal)=>{
console.log(newVal, oldVal);
}, {
once: true
})
</script>
<template>
<div>
count: {{ count }}
<button @click="count++">++</button>
age: {{ obj.age }}
<!-- 正常触发更新age的逻辑,但是由于默认watch监听ref是潜监听(只监听引用对象的地址),所以不会触发watch的回调函数 -->
<!-- <button @click="obj.age++">++</button> -->
<!-- 此时即可观察到watch执行回调函数 -->
<button @click="obj.age++">++</button>
age: {{ obj1.age }}
<button @click="obj1.age++">++</button>
count2: {{ count2 }}
<button @click="count2++">++</button>
</div>
</template>
|
案例7——成绩管理
基本需求:
- 点击删除时可以删除对应的学生
- 成绩不合格时显示红色字体分数
- 用户可以输入科目和分数添加成绩
- 动态计算总分和平均分
- 当表格中没有成绩时显示“暂无数据”,否则不显示
- 学生成绩持久化,即在成绩表改变时将学生成绩保存到
localstorage中,并且默认先从localstorage中读取,不存在再读取默认成绩列表数组
示例:
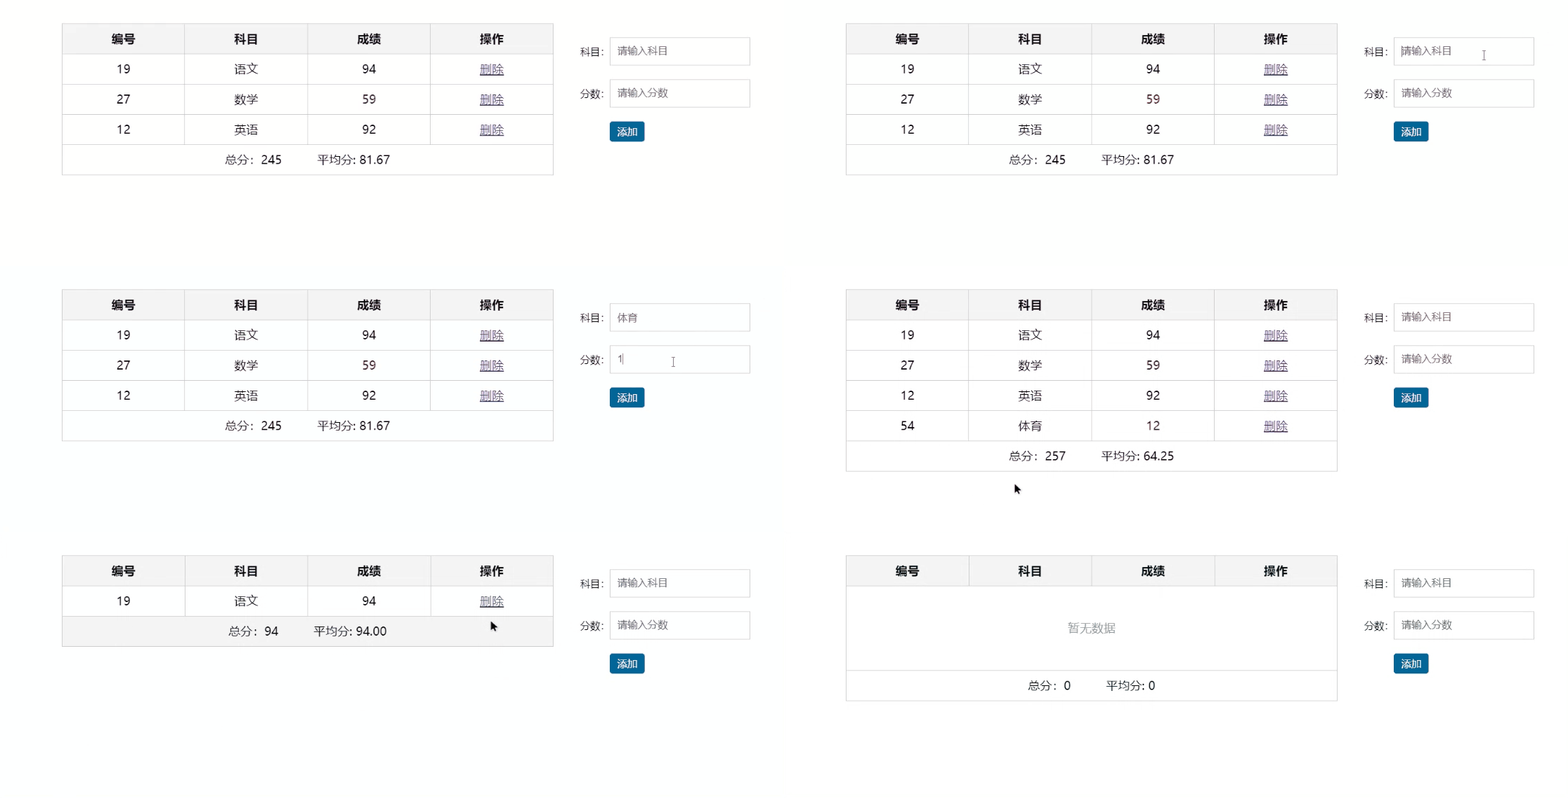
参考代码:
| Vue |
|---|
  1
  2
  3
  4
  5
  6
  7
  8
  9
 10
 11
 12
 13
 14
 15
 16
 17
 18
 19
 20
 21
 22
 23
 24
 25
 26
 27
 28
 29
 30
 31
 32
 33
 34
 35
 36
 37
 38
 39
 40
 41
 42
 43
 44
 45
 46
 47
 48
 49
 50
 51
 52
 53
 54
 55
 56
 57
 58
 59
 60
 61
 62
 63
 64
 65
 66
 67
 68
 69
 70
 71
 72
 73
 74
 75
 76
 77
 78
 79
 80
 81
 82
 83
 84
 85
 86
 87
 88
 89
 90
 91
 92
 93
 94
 95
 96
 97
 98
 99
100
101
102
103
104
105
106
107
108
109
110
111
112
113
114
115
116
117
118
119
120
121
122
123
124
125
126
127
128
129
130
131
132
133
134
135
136
137
138
139
140
141
142
143
144
145
146
147
148
149
150
151
152
153
154
155
156
157
158
159
160
161
162
163
164
165
166
167
168
169
170
171
172
173
174
175
176
177
178
179
180
181
182
183
184
185
186
187
188
189
190
191
192
193
194
195
196
197
198
199
200
201
202
203
204
205
206
207
208
209
210
211
212
213
214
215
216
217 | <script setup>
import { ref, computed, watch } from 'vue'
// 成绩列表
// 7. 修改为默认从localStorage读取,否则再使用默认数据
const scoreList = ref(JSON.parse(localStorage.getItem("sc")) || [
{ id: 19, subject: '语文', score: 94 },
{ id: 27, subject: '数学', score: 59 },
{ id: 12, subject: '英语', score: 92 }
])
// 3. 删除
function del(id) {
// 使用filter筛选出id不等于指定id的元素重新生产一个数组
scoreList.value = scoreList.value.filter(i => i.id != id)
}
// 4. 插入操作
const s = ref("");
const n = ref("");
function add() {
scoreList.value.push({
id: Date.now() % 100,
subject: s.value,
score: n.value
})
// 清空输入框
s.value = "";
n.value = "";
}
// 5. 计算总分
const sum = computed(()=>{
// ps:注意reduce的使用方式
return scoreList.value.reduce((total, i) => total + i.score, 0)
});
// 7. 成绩持久化
// 对象数组中的元素是对象,需要开启深度侦听
watch(scoreList, (newVal)=>{
// 对象数组需要进行序列化
localStorage.setItem("sc", JSON.stringify(newVal));
}, {
deep: true
})
</script>
<template>
<div class="score-case">
<div class="table">
<table>
<thead>
<tr>
<th>编号</th>
<th>科目</th>
<th>成绩</th>
<th>操作</th>
</tr>
</thead>
<!-- 6. v-if与else控制有成绩时不显示“暂无成绩” -->
<tbody v-if="scoreList.length > 0">
<!-- 1. 动态渲染数据 -->
<tr v-for="scores in scoreList" :key="scores.id">
<td>{{ scores.id }}</td>
<td>{{ scores.subject }}</td>
<!-- 2. 成绩不合格时显示红色字体分数 -->
<td :class="{ red: scores.score < 60 }">{{ scores.score }}</td>
<td>
<!-- 去除默认a标签默认的跳转 -->
<a href="#" @click.prevent="del(scores.id)">删除</a>
</td>
</tr>
</tbody>
<tbody v-else>
<tr>
<td colspan="5">
<span class="none">暂无数据</span>
</td>
</tr>
</tbody>
<tfoot>
<tr>
<td colspan="5">
<span>总分:{{ sum }}</span>
<!-- 使用Number中的toFixed方法保留两位小数 -->
<span style="margin-left: 50px">平均分: {{ (sum / scoreList.length).toFixed(2) }}</span>
</td>
</tr>
</tfoot>
</table>
</div>
<form class="form">
<div class="form-item">
<div class="label">科目:</div>
<div class="input">
<!-- 去除收尾空格 -->
<input type="text" placeholder="请输入科目" v-model.trim="s" />
</div>
</div>
<div class="form-item">
<div class="label">分数:</div>
<div class="input">
<!-- 获取数值 -->
<input type="text" placeholder="请输入分数" v-model.number="n" />
</div>
</div>
<div class="form-item">
<div class="label"></div>
<div class="input">
<!-- 去除表单的默认提交 -->
<button class="submit" @click.prevent="add">添加</button>
</div>
</div>
</form>
</div>
</template>
<style>
.score-case {
width: 1000px;
margin: 50px auto;
display: flex;
}
.score-case .table {
flex: 4;
}
.score-case .table table {
width: 100%;
border-spacing: 0;
border-top: 1px solid #ccc;
border-left: 1px solid #ccc;
}
.score-case .table table th {
background: #f5f5f5;
}
.score-case .table table tr:hover td {
background: #f5f5f5;
}
.score-case .table table td,
.score-case .table table th {
border-bottom: 1px solid #ccc;
border-right: 1px solid #ccc;
text-align: center;
padding: 10px;
}
.score-case .table table td.red,
.score-case .table table th.red {
color: red;
}
.score-case .table .none {
height: 100px;
line-height: 100px;
color: #999;
}
.score-case .form {
flex: 1;
padding: 20px;
}
.score-case .form .form-item {
display: flex;
margin-bottom: 20px;
align-items: center;
}
.score-case .form .form-item .label {
width: 60px;
text-align: right;
font-size: 14px;
}
.score-case .form .form-item .input {
flex: 1;
}
.score-case .form .form-item input,
.score-case .form .form-item select {
appearance: none;
outline: none;
border: 1px solid #ccc;
width: 200px;
height: 40px;
box-sizing: border-box;
padding: 10px;
color: #666;
}
.score-case .form .form-item input::placeholder {
color: #666;
}
.score-case .form .form-item .cancel,
.score-case .form .form-item .submit {
appearance: none;
outline: none;
border: 1px solid #ccc;
border-radius: 4px;
padding: 4px 10px;
margin-right: 10px;
font-size: 12px;
background: #ccc;
}
.score-case .form .form-item .submit {
border-color: #069;
background: #069;
color: #fff;
}
</style>
|


